The speed at which technology advances is almost exponential. From mobile phones to cars, electronics become smaller and, miraculously, better at an increasing rate every year. The same is true in the world of precision measurement, wher companies like Florida-based FARO Technologies is developing some of the most innovative solutions available for Canadian manufacturers. Portable coordinate measuring machines (CMMs) from FARO are enabling faster inspection of parts and assemblies, reduction of waste and improved processes for metalworkers throughout the country. 
New Solutions for Contact and Non-Contact Measurement
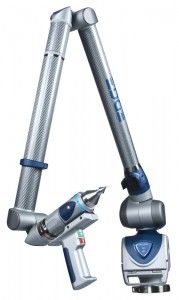
FARO announced the release of the company’s newest measurement arm, the FARO Edge, in late April. Dubbed the world’s first “smart arm”, the Edge featured a series of ground-breaking advancements that not only expedite complex measurements for all (including level-one) users, but also make the device one of the easiest-to-use portable CMMs available. The most obvious new feature (never before seen in a measurement arm), was the inclusion of a touch screen to the base of the device. By adding a screen, FARO effectively eliminated operators’ need for a laptop when performing basic measurements. Instead, the screen itself now guides the user through the measurement routine, and allows for the selecion of pre-programmed operations with a simple touch of the finger. Dimensions are displayed on-screen quickly and clearly, and data can be transmitted wirelessly via Bluetooth, WiFi or SD Card to a laptop computer for more in-depth analysis. That same wireless capability allows multiple arms to be networked, synchronized (for large applications) and monitored throughout production facilities.
The manufacturer’s innovation isn’t limited to electronics. As part of the Edge’s new design, the device features improved counterbalancing and weighting to reduce operator fatigue. In fact, improved weight distribution has resulted in a 25% reduction in handle-weight from previous arms. The relatively short base improves arm stability, and a new base handle enables this portable CMM to truly be, well, portable. once the arm is up and running, the onboard QuickTools functionality allows operators to create custom measurement routines for repetitive tasks. The result is improved consistency between users in the measurement of common parts. Numerous personalized settings – display, sound, power management and so on – further add to the “smart” aspects of the arm.
When hard-probing gives way to rapid prototyping or reverse engineering applications, FARO’s Laser Line Probe (LLP) delivers non-contact measurement capabilities in an incredibly small package. The LLP has been totally redesigned to work in tandem with the Edge and attaches quickly to the handle to form the complete Edge ScanArm solution. FARO’s redesign has dramatically reduced the weight of the LLP to a mere 2.7 oz. When attached to the Edge handle, the entire fixture weighs-in at a miniscule 7.8 ounces, but there’s a ton of functionality packed into this small device. The LLP’s laser stripe has been extended to nearly 4” in width. Advanced CMOS technology allows for scanning at a rate of nearly 60 frames per second, and produces over 45,000 points of three-dimensional data over that same span. The wider and faster stripe allows operators to capture more and better data than ever before, and with much less user fatigue. As a fully integrated solution, the LLP uses the Edge’s built-in indicator lights to provide range feedback. LEDs vary in color from green to red as the user enters and leaves optimal scanning range. FARO has truly gone the extra mile here to take the guesswork out of non-contact measurement applications.
Laser Trackers for Large Scale Measurement
The FARO Edge is ideal for measuring small-to-medium parts and materials. Bigger parts, and other outsized applications like machine alignments and installations, require a CMM more suited to large-scale applications. The FARO Laser Tracker ION is the solution for jobs of this sort, and is the most advanced FARO Laser Tracker ever introduced. The ION boasts volumetric accuracy of .002” at 33 feet, and range of up to 361 feet in diameter. The laser tracker is fast, as well as accurate. In fact, the instant-on laser and smart warm-up features mean that stabilization time is minimized, and there is little time wasted to begin most measurement applications. To ensure the accuracy of those measurements, the integrated weather station and precision level minimize the impact of environmental changes and help establish level to gravity within the measurement job. To facilitate measurement, FARO offers a complete line of break resistant and high-performance spherically-mounted reflectors (SMRs) and RetroProbes, which allow for articulated arm-style measurements.
A Solution for Nearly Any Measurement Challenge
There are many options available to Canadian manufacturers looking to improve the speed and accuracy of their quality assurance processes. The Edge from FARO reduces work time and minimizes waste for operators of all skill levels, and with the fully-integrated LLP, non-contact measurement and point cloud analysis are now made incredibly simple. FARO has clearly listened to the customer, who consistently demands tighter tolerances and more user-friendly interfaces in their portable measurement arms. For larger applications, the FARO Laser Tracker ION offers high accuracy and ease-of-use while again minimizing work time. As technology becomes smaller and more powerful, count on FARO Technologies to keep up with, and exceed, the pace of innovation to deliver advanced and accurate measurement technologies to Canadian metalworkers.

